Thursday, March 10, 2016

Watercolored Bloomin Heart, by Patty Bennett


Posted: 09 Mar 2016 12:02 AM PST

So this is just one of those cards that I think is 8,000 times prettier in person.. when you color with the Wink of Stella, it just doesn't show up as well in photos.. so trust me, this is gorgeous in person! 

Stampin' Up! Bloomin Heart thinlit die cut with watercolor paper and colored with Stampin' UP! ink refills and the Wink of Stella pen, by Patty Bennett at pattystamps.com

I die cut the Bloomin' Heart thinlit die (pg 16 of the current Occasions catalog) using watercolor paper, then I watercolored the flowers and leaves with my Clear Wink of Stella Pens and Stampin' UP! ink refills in Mossy Meadow and Calypso Coral.

Stampin' Up! Bloomin Heart thinlit die cut with watercolor paper and colored with Stampin' UP! ink refills and the Wink of Stella pen, by Patty Bennett at pattystamps.com


I tried both wetting the paper first and then using the Wink of Stella pen, and I also tried not wetting it first, and it was ok either way (you'll see what I mean in this video).
The Bloomin' Heart thinlit die is so gorgeous!!  I decided to try this one out using Watercolor Paper! While I'm pretty sure that these dies aren't meant to cut the watercolor paper, it did do a great job and I only had to pick out a little part of it with a Paper Piercer after using the Big Shot die brush to roll over it (see the Stampin' UP! video HERE for more info on that).

Stampin' Up! Bloomin Heart thinlit die cut with watercolor paper and colored with Stampin' UP! ink refills and the Wink of Stella pen, by Patty Bennett at pattystamps.com

 I WISH you could see all the beautiful sparkle on this card, created by coloring with the Wink of Stella pen!!! CLICK HERE to see a video of this fun technique on a previous card!
I used a circle template to trace a part of a circle on the front flap of my card, then cut it out, and used the circle template again to draw a black like with my Project Life marker.  It really made the front of this card zing!   When I stamped the thank you, I curved it a bit on the clear block so that it would fit perfectly along the curve.  Don't have a circle template? try a dinner plate.

Stampin' Up! Bloomin Heart thinlit die cut with watercolor paper and colored with Stampin' UP! ink refills and the Wink of Stella pen, by Patty Bennett at pattystamps.com

To make it easier when I am coloring with my Wink of Stella pens, I wrap washi tape around the pen and cap in a similar color to what I'm using.  You can always just wipe them off in between colors, and keep using the same pen, or, have multiple pens going in different colors.

Stampin' Up! Bloomin Heart thinlit die cut with watercolor paper and colored with Stampin' UP! ink refills and the Wink of Stella pen, by Patty Bennett at pattystamps.com

This delicate, yet bold card is also accented with the Calypso Coral script pattern in the Subtles Color Collections DSP stack (pg 144 in the current annual catalog), and a piece of Mossy Meadow patterned paper from the Botanicals paper pack, some Silver Glimmer tape (a Sale a Bration item you can get free with your $50 order), some Calypso Coral Seam Binding Ribbon and a Rhinestone in the center of each flower.

Stampin' Up! Bloomin Heart thinlit die cut with watercolor paper and colored with Stampin' UP! ink refills and the Wink of Stella pen, by Patty Bennett at pattystamps.com


Card Base: Thick Whisper White, 4-1/4" x 11" folded in 1/2
Calypso Coral Script DSP: 4-1/4" x about 3"
Mossy Meadow patterned paper: 3/4" x 4-1/4"

Patty's color combo for this Bloomin' Heart card:


 Bloomin Heart Video:


Wink Of Stella Video:


Price: $11.00
Price: $10.00
Price: $110.00

Patty's Blog


Tuesday, March 8, 2016

Rose Wonder Floating Reinker Technique by Sandi MacIver


This class has 4 newly designed cards, all using the Floating Reinker Technique and one even combines the faux cloisonne technique as well.  You will spend hours of fun playing with your Stampin Up Reinkers and your Aqua Pens creating beautiful roses.

Card 4

Here is Card #4 in the class, I just love how the colors blended on this one and look closely, I added a little “wink of stella” in a few places….
Stampin Up Rose Wonder and the Floating Reinker Technique is the newest class over at Stamping and Blogging 

Stampin Up Rose Wonder Typeset card by Sandi @ www.stampinwithsandi.com
Recently I had a couple of girlfriends over and we were playing with the stamp set/framelit bundle, and we created this pretty easel card.  (you can find easel card instructions here), although the measurements are slightly changed, see the card recipe at the end of the post for those.
  • We cut the rose out of Basic Black, then we cut just the rose part again out of Typeset Specialty Designer Paper and the leaves out of Mossy Meadow.
  • Next we glued the die cut down onto a piece of Basic Black and took all the little cut out pieces and glued them back in, (I sponged the rose pieces with Soft Suede first) and then cut it out by hand….yep, that took a few minutes.
  • Next we created the 5 x 5 easel card from Basic Black, the mat is Watermelon Wonder to match that lush 1″ Stitched Ribbon, and the card front for the background is the Timeless Elegance Designer Paper.
  • The base of the card is another designer paper from Timeless Elegance and the sentiment is stamped and die cut onto a third piece:  I love that they all coordinate but are slightly different I think it adds great interest to the card.
The card recipe and supply list are at the end of this post for you

Group at 650


Card Base:  Basic Black 5 x 10, Watermelon Wonder 4-3/4 square (2), Timeless Elegance 4-5/8 square (2)
Art Piece:  Basic Black 4-1/4 x 5-1/2 – to die cut rose and leaves, Mossy Meadow 4-1/4 x 5-1/2 – to die cut the leaves, Typeset Specialty 4 x 4 – to die cut the rose.
Sentiment 1-1/2 x 3 Timeless Elegance DSP

Supplies used to create the Stampin UP Rose Wonder Easel Card:

Product List


Sandi's Blog


Collared Card, by Jennifer Blomquist


I’ve recently seen this idea of the Collar Fold card and I just had to give the technique a try!  And what more fun way than to have a little bear popping in to say hello and Happy Birthday to you!


A Few Fun Card Details

This card was a fun way to play around with a few different things… I grabbed a cheery paper from the It’s My Party designer paper stack and made my fold first, then I started building the card around it.  

I started with the larger bear from the Bear Hugs stamp set.  I actually had the chick from the Honeycomb Happiness stamp set first, but I figured everyone had seen me use him a billion times, so I needed to break out of the rut and try something new.  And isn’t this bear just too stinkin’ cute?  I stamped him in the Archival Basic Black ink onto a piece of Whisper White paper and then colored using an Aqua Painter and Tip Top Taupe for the bear and my Stampin’ Write markers for the flowers.


I also pulled out another new set – the Party Pants stamp set.  This is one of the limited time release sets that just came out for Sale-a-Bration.  You can get it free with a $50 purchase and only until the end of the month!  I loved that all of the sentiments fit in the balloons and that the balloon fits the Balloon Bouquet punch from the Occasions catalog!  So, it was the perfect way to hold back my flaps.


Did you spot it?  The last touch?  I use Crystal Effects to create a raised gloss over a bunch of the Balloons on the patterned paper.  It makes a HUGE difference and is so EASY to do!  I really need to do that more often. Smile 

How to make a collar fold card

Now if you want to make a card like this at home, here is how you do it:
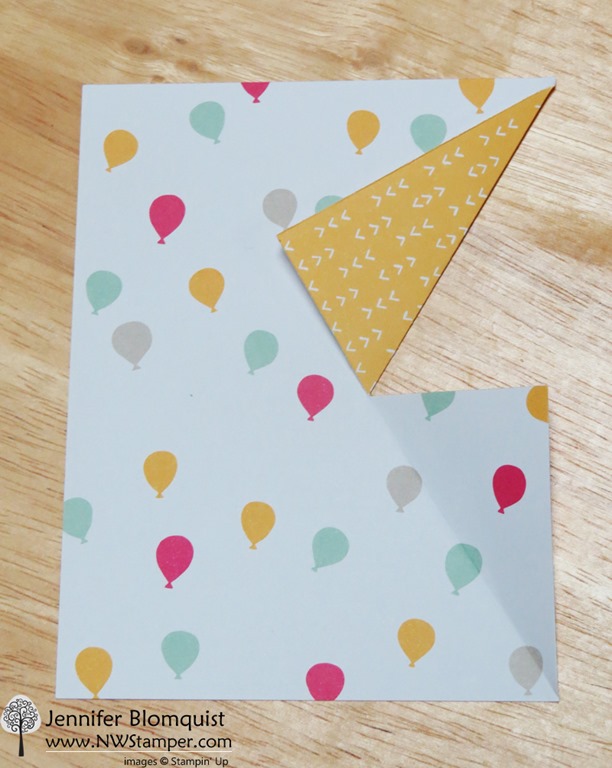
  • Cut a piece of pattern paper to 5” x 3.75”.  I highly recommend a paper that has high contrast between the two sides. 
  • Cut a slight halfway down on the patterned paper (so 2 1/2” down & 2” in) 


  • Fold back the patterned paper.  If you want, you can use your trimmer to SCORE the paper for you, or just do what I did and fold it by hand.


  • Stamp your image on a piece of Whisper White paper the same dimensions as your patterned paper (5” x 3.75”).
    TIP – to get your stamped image peeking out just the right amount.  After you fold your flaps back, set it onto your white paper and trace the cut opening using a pencil.  Then take away the patterned paper and use the pencil marks as a guide when stamping.  Erase the marks when you finish stamping.
  • Color your image and then glue the patterned paper over the Whisper White cardstock.
  • Mount to a piece of cardstock for your mat (5 1/4” x 4”)
  • Decorate your card as desired
The possibilities are endless and you can do all kinds of fun designs by mixing and matching your patterned paper and stamped images.


Jennifer's Blog