
A Few Fun Card Details
This card was a fun way to play around with a few different things… I grabbed a cheery paper from the It’s My Party designer paper stack and made my fold first, then I started building the card around it.I started with the larger bear from the Bear Hugs stamp set. I actually had the chick from the Honeycomb Happiness stamp set first, but I figured everyone had seen me use him a billion times, so I needed to break out of the rut and try something new. And isn’t this bear just too stinkin’ cute? I stamped him in the Archival Basic Black ink onto a piece of Whisper White paper and then colored using an Aqua Painter and Tip Top Taupe for the bear and my Stampin’ Write markers for the flowers.

I also pulled out another new set – the Party Pants stamp set. This is one of the limited time release sets that just came out for Sale-a-Bration. You can get it free with a $50 purchase and only until the end of the month! I loved that all of the sentiments fit in the balloons and that the balloon fits the Balloon Bouquet punch from the Occasions catalog! So, it was the perfect way to hold back my flaps.

Did you spot it? The last touch? I use Crystal Effects to create a raised gloss over a bunch of the Balloons on the patterned paper. It makes a HUGE difference and is so EASY to do! I really need to do that more often.
How to make a collar fold card
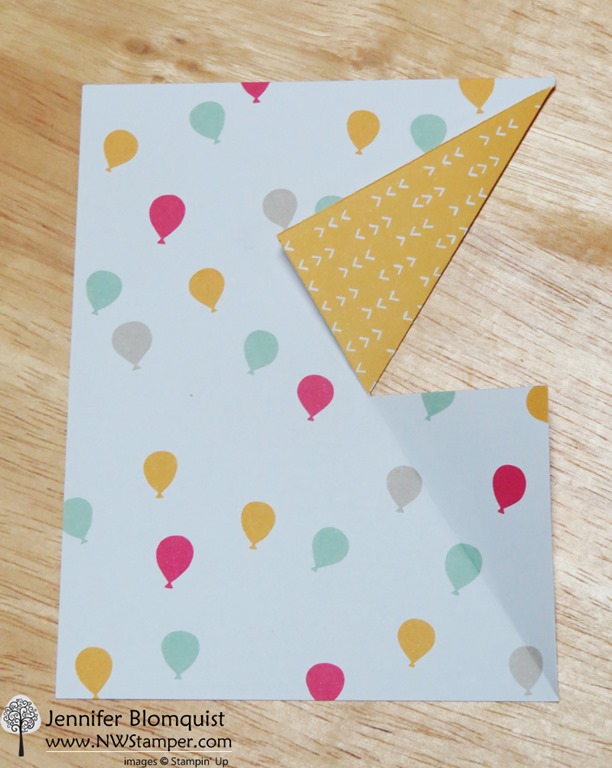
Now if you want to make a card like this at home, here is how you do it:- Cut a piece of pattern paper to 5” x 3.75”. I highly recommend a paper that has high contrast between the two sides.
- Cut a slight halfway down on the patterned paper (so 2 1/2” down & 2” in)

- Fold back the patterned paper. If you want, you can use your trimmer to SCORE the paper for you, or just do what I did and fold it by hand.
- Stamp your image on a piece of Whisper White paper the same dimensions as your patterned paper (5” x 3.75”).
TIP – to get your stamped image peeking out just the right amount. After you fold your flaps back, set it onto your white paper and trace the cut opening using a pencil. Then take away the patterned paper and use the pencil marks as a guide when stamping. Erase the marks when you finish stamping. - Color your image and then glue the patterned paper over the Whisper White cardstock.
- Mount to a piece of cardstock for your mat (5 1/4” x 4”)
- Decorate your card as desired

Jennifer's Blog
No comments:
Post a Comment